PolarFire SoC
PolarFire SoC MSS Configurator launcher
The launcher is intended to simplify the process of editing existing MSS configurations and simplify switching between various configuration variants.
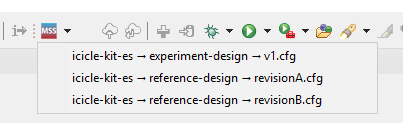
The tool can detect multiple PolarFire SoC MSS Configurator configs and allow users to invoke PolarFire SoC MSS Configurator with them:
Note
This feature requires a compatible project to work correctly. There are no compatible projects (including the bundled example projects) at the time of SoftConsole 2022.2 release. Projects deployed on GitHub should start utilizing this feature in the future.
The polarfire-soc-bare-metal-examples repository contains mpfs-gpio-interrupt example project. It’s located here and should be the first project converted to the newer folder structure layout needed by the PolarFire SoC MSS Configurator launcher to work correctly.
Please read this section from the online variant of the documentation as it might contain revisited information.
When used with a correct project then the flow is as specified:
Click the dropdown next to the button (clicking the button directly will re-launch previous selection)
Select desired config.
This will run the PolarFire SoC MSS Configurator.
Make the desired changes in the MSS Configurator.
Save the changes to the “.cfg” file by clicking the “Save” icon.
Click “Generate” icon and confirm the default destination directory (this will create the XML file in the correct location).
Exit MSS Configurator.
To apply the changes in the XML file generated in step 3 above, you must compile the SoftConsole project.
Note
Make sure that the project’s “Pre-build steps” are configured correctly to generate the configuration headers from the XML file and that it points to the XML file that you want to generate the header information from (See Project properties -> C/C++ build -> Settings -> Build steps -> Pre-build steps -> command).
The new projects will be following this flow:
![digraph {
graph [rankdir="LR", ranksep=.01, bgcolor=transparent];
node [fontname="Verdana", fontsize="9", shape="rectangle", width=.1, height=.2, margin=".04,.01", style=filled, fillcolor=white];
edge [arrowsize=.7];
".cfg" -> "Changes in configurator" -> ".xml" -> "Python script" -> ".c and .h" -> "GCC" -> ".elf and .hex"
}](../_images/graphviz-38399a111d7cc077423e354d837f8d56a0dc5915.png)
Preference page (settings)
The PolarFire SoC MSS Configurator launcher needs to know where the PolarFire SoC MSS Configurator is located, this will be auto-detected correctly if the tools are installed in their default paths. If the default settings do not suit the user, user is free to change them in the preference page:
![digraph { graph [rankdir="LR", ranksep=.01, bgcolor=transparent]; node [fontname="Verdana", style=filled, fillcolor=white, fontsize="9", shape="rectangle", width=.1, height=.2, margin=".04,.01"]; edge [arrowsize=.7]; "SoftConsole Menu toolbar" -> "Window" -> "Preferences" -> "Microchip" -> "PolarFire SoC MSS Configurator launcher"; }](../_images/graphviz-4eaf62b9740e5a3d6413e5b8f4711c744e112113.png)
Or by pressing
CTRL + SHIFT + Pto trigger the ‘Find Actions’ menu and typingMSS Configuratorto find shortcut to the preference page.
Warning and Error messages
These two following error messages can indicate that an incompatible project is used:
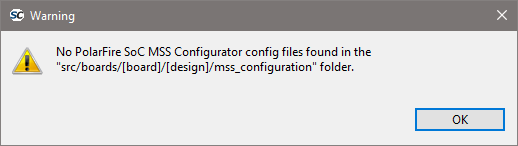
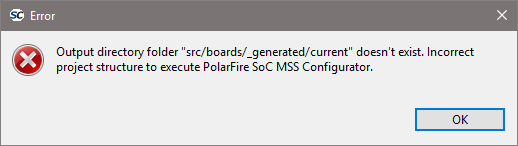
Older project layout is using the src/boards/<board>/ layout while newer projects will be using src/boards/<board>/<design> layout.
This means updating all include paths, updating linker scripts, python pre-build step and all other references for every single build configuration. For the users it is more convenient to start with an example project with the new folder structure layout, and import their application into it instead of trying to upgrade an existing project based on the older structure.
JDC helper
The Job Data Container helper is a wrapper script to make use of jdcgen easier. The jdcgen is shipped with Libero SoC v2022.2 and can be used to manipulate the content of jdc files.
The user from within Libero will export their original jdc file with pre-existing eNVM client content. Then the user can run SoftConsole to replace jdc’s eNVM client content without the need to run Libero and without access to the original Libero design project. The jdc file can be converted to a job file and programmed via FlashPro Express.
The JDC helper can be run without any arguments, if no --workdir is provided then the cwd current working directory will be used as its workdir.
From within the workdir it will search for a jdc and a elf file. If multiple elf/jdc files are present in the workdir then --jdc or -elf arguments can be used to specify exactly which files should be used.
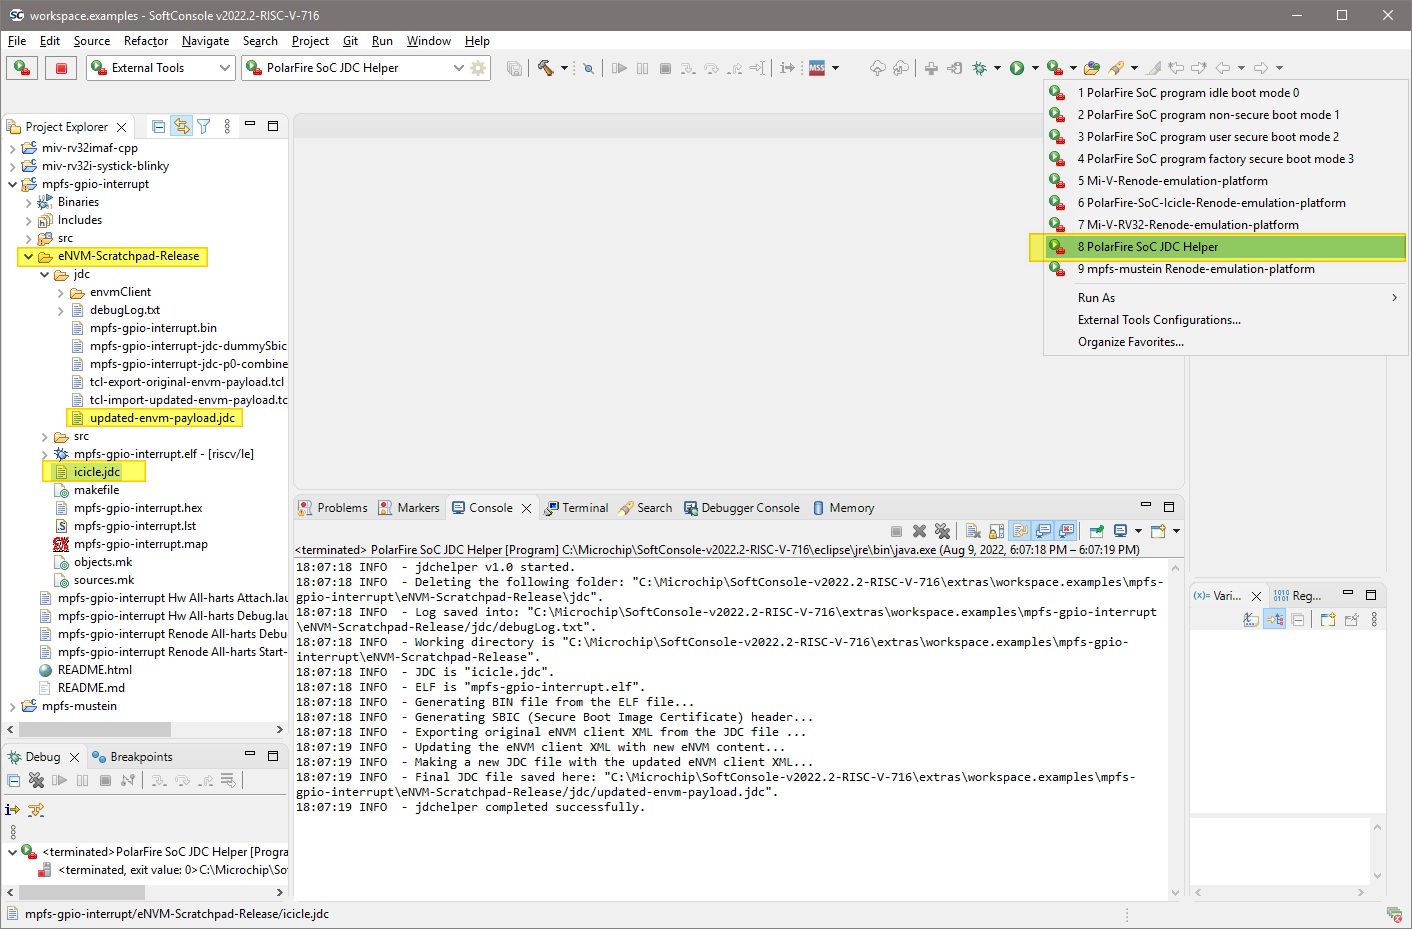
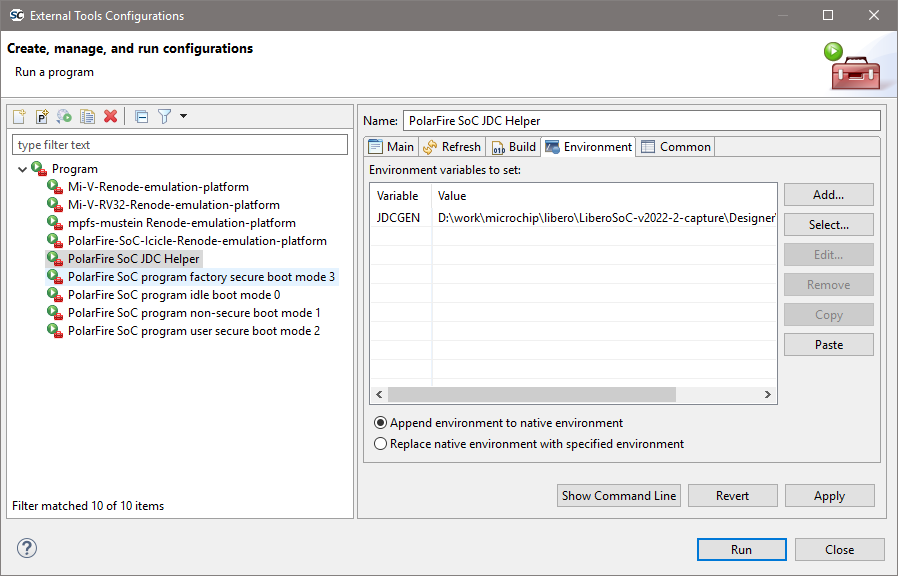
To use the JDC helper from SoftConsole an external launcher can be used:
Build a eNVM application by selecting the correct configuration, for example
eNVM-Scratchpad-Release, the application needs to be linked against eNVM page 1.Drag and drop your jdc file into the build folder for that configuration:
<YOUR_PROJECT>/<PROJECT_CONFIGURATION>. In the figure below theicicle.jdcfile is copied into theeNVM-Scratchpad-Releasebuild folder (Note these names might be different for different projects.)Make sure the project is selected in the
Project Explorerview tab and then launchPolarFire SoC JDC Helperexternal launcher.If the
JDCGENenvironment variable is set up correctly, then the tool should finish correctly and the modified jdc file will be located here:<YOUR_PROJECT>/<PROJECT_CONFIGURATION>/jdc/updated-envm-payload.jdc
Troubleshooting
Debug log with a verbose description of what happened can be found here:
<YOUR_PROJECT>/<PROJECT_CONFIGURATION>/jdc/debugLog.txt
When asking for assistance it’s good to attach this debug log with a request.
Setting up JDCGEN environment variable
The JDC helper needs to know where the jdcgen binary is located. If the tools are installed in their default locations then JDC helper will detect it and set up the JDCGEN correctly.
The following locations are tested:
C:/Microchip/Program_Debug_v2022.2/Program_Debug_Tool/bin/jdcgen.exeC:/Microsemi/Program_Debug_v2022.2/Program_Debug_Tool/bin/jdcgen.exeC:/Microchip/Libero_SoC_v2022.2/Designer/bin/jdcgen.exeC:/Microsemi/Libero_SoC_v2022.2/Designer/bin/jdcgen.exe
/usr/local/microchip/Program_Debug_v2022.2/Program_Debug_Tool/bin/jdcgen/usr/local/microsemi/Program_Debug_v2022.2/Program_Debug_Tool/bin/jdcgen/usr/local/microchip/Libero_SoC_v2022.2/Designer/bin/jdcgen/usr/local/microsemi/Libero_SoC_v2022.2/Designer/bin/jdcgen
If the jdcgen is found then it’s preferred to let this auto-detection work as it is. However, if the auto-detection doesn’t work due to the tools being installed in different paths, then the JDCGEN environment variable has to be set up manually and it needs to be a full absolute path to the binary (including the binary and its extension). This can be done globally in the OS system settings, inside the external launcher settings:
Or through editing the SoftConsole startup script (see comments inside the script):
softconsole.cmd
softconsole.sh
Location of SBIC (Secure Boot Image Certificate)
The firmware application payload must be linked to eNVM page 1 and SBIC will be placed at eNVM page 0. This gives flexibility and allows firmware field updates in the future without having to update the bitstream as the location of SBIC doesn’t change.
Bundled help
To display help, run the tool with --help argument:
<SC_INSTALL_DIR>/eclipse/jre/java.exe -jar <SC_INSTALL_DIR>/extras/mpfs/jdcHelper.jar --help
<SC_INSTALL_DIR>/eclipse/jre/java -jar <SC_INSTALL_DIR>/extras/mpfs/jdcHelper.jar --help
It will print help as follows:
10:44:01 INFO  - jdchelper v1.0 started.
Usage: java -jar jdchelper.jar [--workdir directory] [--help] [--jdc relative_path_to_jdc_file] [--elf relative_path_to_elf_file]

  --workdir directory
    Description:
      Working directory, preferably pointing a SoftConsole build folder containing both JDC and ELF files.
    Default if not specified:
      Current working directory

  --help
    Description:
      Print this help

  --jdc
    Description:
      An original JDC programming file to be updated with newer eNVM client content.
    Allowed values:
      Any valid path to a JDC file with a PolarFire SoC eNVM client. The path must be relative
      to the 'workdir', absolute paths are not supported.
    Default if not specified:
      If not specified then the working directory is searched for any JDC file

  --elf
    Description:
      Boot program ELF file
    Allowed values:
      Any valid ELF filename matching eNVM page 1 linkage requirements. The path must be relative
      to the 'workdir', absolute paths are not supported.
    Default if not specified:
      If not specified then the working directory is searched for any ELF file
PolarFire SoC boot mode programming support in SoftConsole
Required tools
SoftConsole v2022.2-RISC-V
Libero SoC v2022.2 or Programming and Debug Tools v2022.2
PolarFire SoC Boot Modes
PolarFire SoC supports four boot modes which determine what happens when the device is powered on/reset. In particular, what exactly the RISC-V multi-core CPU Core Complex part of PolarFire SoC’s Microcontroller Subsystem (MSS) does out of reset:
Boot mode 0 “idle boot”: boots and simply waits for a debugger connection.
Boot mode 1 “non-secure boot”: boots and executes a program stored in eNVM which has been linked for storage in and execution from eNVM.
Boot mode 2 “user secure boot”: boots, checks the integrity of an encrypted and/or authenticated program stored in sNVM and, if it is correct, copies it to LIM (Loosely Integrated Memory) RAM and starts executing it from there. The program executed may be a secure boot loader implemented by the user. The program is linked for execution from LIM.
Boot mode 3 “factory secure boot”: boots, verifies a program image stored in eNVM using an Elliptic Curve Digital Signature Algorithm (ECDSA) and, if correct, starts executing the program from eNVM. The program is linked for storage in and execution from eNVM.
Refer to the PolarFire SoC documentation for more detailed information about these boot modes.
https://www.microsemi.com/product-directory/soc-fpgas/5498-polarfire-soc-fpga#documentation
fpgenprog
fpgenprog is the tool provided by Libero SoC and Programming and Debug Tools for programming PolarFire SoC boot modes and storing the associated programs in NVM (eNVM or sNVM). fpgenprog calls other programming file generation and programming tools (for example FlashPro Express) in order to perform boot mode programming. fpgenprog and related tools are NOT bundled with SoftConsole so Libero SoC or Programming and Debug Tools must be installed in order to make them available to SoftConsole.
Refer to the website for more information about these tools:
Programming and Debug Tools: https://www.microsemi.com/product-directory/dev-tools/5592-programming-and-debug#downloads
By default Libero SoC v2022.2 and Programming and Debug tools v2022.2 install into the following locations:
Windows
C:\Microchip\Libero_SoC_v2022.2
C:\Microchip\Program_Debug_v2022.2
Linux
/usr/local/microchip/Libero_SoC_v2022.2
/usr/local/microchip/Program_Debug_v2022.2
These locations will be tested trying to find the fpgenprog binary when the FPGENPROG is not explicitly set:
Windows
C:\Microchip\Libero_SoC_v2022.2\Designer\bin64\fpgenprog.exe
C:\Microchip\Program_Debug_v2022.2\Program_Debug_Tool\bin64\fpgenprog.exe
Linux
/usr/local/microchip/Libero_SoC_v2022.2/Designer/bin64/fpgenprog
/usr/local/microchip/Program_Debug_v2022.2/Program_Debug_Tool/bin64/fpgenprog
Note
These are the default locations and the actual location will differ if a non-default install location is specified at install time.
Note
If the Libero v2022.2 or Program and Debug v2022.2 are installed in the default path and FPGENPROG is not set, then they should be automatically detected by the mpfsBootmodeProgrammer.jar. When autodetection works well then it’s best to not have FPGENPROG environment variable set. Set the FPGENPROG only if the autodetection fails. When setting the FPGENPROG environment variable, then make sure to set it to the full path including the binary itself. For example: D:\Libero_SoC_v2022.2\Designer\bin64\fpgenprog.exe
mpfsBootmodeProgrammer
In order to simplify boot mode programming, SoftConsole bundles the mpfsBootmodeProgrammer Java program utility:
<softconsole-install-dir>/extras/mpfs/mpfsBootmodeProgrammer.jar
mpfsBootmodeProgrammer takes care of the details of converting a program executable ELF file for use with the selected boot mode and calling fpgenprog to program target with the relevant boot mode data and store the boot program image in NVM (eNVM or sNVM).
Full sources for mpfsBootmodeProgrammer and instructions on how to build it are also bundled with SoftConsole (in the same folder as the JAR file).
Note
The mpfsBootmodeProgrammer.jar is tested and developed against the SoftConsole’s bundled
Java JRE environment. If the mpfsBootmodeProgrammer.jar is used outside SoftConsole then
for the best results always use the SoftConsole’s Java JRE.
Boot mode programming external launch configurations
The SoftConsole workspace comes preconfigured with four external tool launch configurations, one for each of the four boot modes, which are accessible from the External Tools toolbar button or Main Menu > External Tools.
PolarFire SoC program idle boot mode 0
PolarFire SoC program non-secure boot mode 1
PolarFire SoC program user secure boot mode 2
PolarFire SoC program factory secure boot mode 3
Each of these external tool launch configurations passes a default set of command line options to the mpfsBootmodeProgrammer utility for the relevant boot mode. These command line options can be adjusted if needed. See below for the mpfsBootmodeProgrammer usage/help text which describes all options.
By default, with the exception of boot mode 0, these external tool launch use, as their working directory, the selected project’s active build configuration directory and attempts to process the ELF file found there.
The project to be used for boot mode programming must be selected in the Project Explorer and the relevant build configuration must be built and the ELF file exist in order for the boot mode 1, 2 and 3 external tool launch configurations to work.
Boot mode 0 does not require a project to be selected/built and, by default,
works in the <SoftConsole-install-dir>/extras/mpfs/bootmode0 directory.
A project can be selected in the Project Explorer by clicking on any folder in the project hierarchy. If no project is selected then a message of the following form will be displayed:
Problem Occurred
'Launching PolarFire SoC program ... boot mode ...' has encountered a problem.
Variable references empty selection '${project_loc}'
The active build configuration can be selected in SoftConsole in different ways including by using the “Hammer” build toolbar button dropdown list of available build configurations or by:
![digraph {
graph [rankdir="LR", ranksep=.01, bgcolor=transparent];
node [fontname="Verdana", fontsize="9", shape="rectangle", width=.1, height=.2, margin=".04,.01", style=filled, fillcolor=white];
edge [arrowsize=.7];
"Right click on <your_project> in the Project Explorer" -> "Build Configurations" -> "Set Active" -> "<build-configuration>"
}](../_images/graphviz-6d869669a16372b7771b99a9901c73e7d4bb422b.png)
If the selected build configuration’s directory does not exist then a message of the following form will be displayed:
Problem Occurred
'Launching PolarFire SoC program ... boot mode ...' has encountered a problem.
The working directory ... does not exist for the external tool named PolarFire SoC program ... boot mode ...
If no ELF file exists or other validation checks fail then the mpfsBootmodeProgrammer utility will emit an appropriate warning or error message to the output log.
mpfsBootmodeProgrammer always generated a <workdir>/bootmode<n>/debugLog.txt
log file which contains detailed information about the tasks carried out.
Boot program link requirements
A boot mode 1 or 3 program must be linked for storage in and execution from PolarFire SoC’s eNVM. The program can be linked for anywhere in the eNVM address range 0x20220100-0x2023FFFF (128KiB - 256 bytes). Because an eNVM page (256 bytes) is required before the program image in order to store the boot mode 1 header or boot mode 3 SBIC (Secure Boot Image Certificate) the program cannot be linked for eNVM page 0 = address 0x20220000. The linker script used to link the program should define eNVM as follows:
/* Boot modes 1 & 3 need an eNVM page before the program image so start eNVM at page 1 not 0 */
eNVM (rx) : ORIGIN = 0x20220100, LENGTH = 128k-256
Boot mode 1/3 programs must also be linked on an eNVM 256 byte page boundary.
SoftConsole/mpfsBootmodeProgrammer cater for boot mode 1/3 programs linked at eNVM pages/addresses higher than 1/0x20220100 but Libero only supports those that are linked for 0x20220100.
Boot mode 2 programs must be linked for LIM (Loosely Integrated Memory) RAM at address range 0x08000000-0x081dffff (1920KiB) and aligned to a 32-bit word address. The program is stored in PolarFire SoC’s sNVM. The theoretical maximum sNVM storage space available is < 56KiB. The actual sNVM storage space available and sNVM start page will be dictated by the Libero designed with which the target is programmed. For example, depending on the MSS configuration and Libero design contents some sNVM clients will be automatically generated precluding the relevant pages from being used for a boot mode 2 program image.
Important
It is critical, when programming boot mode 2 from SoftConsole, that the available sNVM space and relevant start page are checked in the Libero project first. Not doing so could cause corruption of sNVM content required for correct functioning of the target design.
mpfsBootmodeProgrammer does validation checking on the boot program ELF file to ensure that it matches the selected boot mode requirements.
Generated artifacts
mpfsBootmodeProgrammer works in the specified workdir and generates artifacts into a bootmodeN (0 <= N <= 3) directory below this.
By default, the preconfigured boot mode 0 external tool launch configuration
works in <SoftConsole-install-dir>/extras/mpfs and generates aretefacts into
the bootmode0 directory below this.
By default, the preconfigured boot mode 1-3 external tool launch configurations use the selected project’s active build configuration directory as the workdir and generates artifacts into a bootmodeN (1 <= N <= 3) directory below this.
mpfsBootmodeProgrammer generates a <workdir>/bootmodeN/debugLog.txt (0 <= N <=
3) log file which can be useful for checking what operations were carried out
especially in the case of a programming failure.
For boot modes 1-3 mpfsBootmodeProgrammer generates the boot mode program image Intel Hex file that can be used in Libero:
![digraph {
graph [rankdir="LR", ranksep=.01, bgcolor=transparent];
node [fontname="Verdana", fontsize="9", shape="rectangle", width=.1, height=.2, margin=".04,.01", style=filled, fillcolor=white];
edge [arrowsize=.7];
"Design Flow" -> "Program Design" -> "Configure Design Initialization Data and Memories" -> "eNVM/sNVM configurators"
}](../_images/graphviz-6140ce83a648b520ed6a7ff2ccdea95eed81cce9.png)
The name of this file includes
the ELF file basename - for example “mpfs-gpio-interrupt” for “mpfs-gpio-interrupt.elf”
“bmN” (1 <= N <= 3) indicating the boot mode
“pM” (where M is an NVM page number) indicating the NVM (eNVM or sNVM) page at which the boot mode program image (including prepended “header” data) is stored.
For boot mode 2 the filename also contains ap or ac indicating whether the
boot program is stored in authenticated plaintext or authenticated ciphertext
sNVM pages respectively.
Examples of boot mode program image Intel Hex file names include:
Boot mode 1: mpfs-gpio-interrupt-bm1-p0.hex
Boot mode 2: mpfs-gpio-interrupt-bm2-ap-p20.hex (authenticated plaintext)
Boot mode 2: mpfs-gpio-interrupt-bm2-ac-p32.hex (authenticated encrypted ciphertext)
Boot mode 3: mpfs-gpio-interrupt-bm3-p0.hex
For boot mode 2 the USK (User sNVM/Secret Key) used is stored in
<elf-file-basename>-bm2-usk.txt. This or another USK is required when
configuring the boot mode 2 program image sNVM client in Libero.
For boot mode 3 the ECC (Elliptic Curve Cryptography) public key x and y values
are stored in <elf-file-basename>-bm3-public-key-xy.txt and these details are
required when configuring the boot mode 3 program image eNVM client in Libero.
Boot mode 3 Elliptic Curve Cryptography
The ECC keys can be either generated on demand by the tool or read from external files (X.509 used for public key files and PKCS#8 for private key files)
Either specifying explicitly to generate the keys as shown in the snippet below:
--bootmode 3 --workdir <PROJECT_PATH> --keys GENERATE
Or using the default behavior and not specifying the --keys GENERATE at all:
--bootmode 3 --workdir <PROJECT_PATH>
Argument --keys SEPARATED has to be used, SEPARATED because private and public
files are each in separated files. Keys have to the use elliptical curve NIST P-384 algorithm (secp384r1 in Java/OpenSSL).
--bootmode 3 --workdir <PROJECT_PATH> --keys SEPARATED <PATH_TO_PRIVATE_PEM_FILE> <PATH_TO_PUBLIC_PEM_FILE>
If the user wants to generate his own set of keys, then openssl can be used, on Linux it’s
usually part of any decent distribution installation and on Windows the following project
can be used:
https://slproweb.com/products/Win32OpenSSL.html
Invoking these following commands will produce private.pem and public.pem files:
openssl ecparam -name secp384r1 -genkey -noout -out combined.ec.key
openssl pkcs8 -topk8 -nocrypt -in combined.ec.key -out private.pem
openssl ec -in private.pem -pubout -out public.pem
Then these files can be used as arguments:
--bootmode 3 --workdir <PROJECT_PATH> --keys SEPARATED private.pem public.pem
Note
Password-protected private keys are not currently supported.
Note
After the mpfsBootmodeProgrammer is run with boot mode 3, then the ECC (Elliptic Curve Cryptography) X and Y values of the public key
will be stored in <elf-file-basename>-bm3-public-key-xy.txt file. The X and Y values are required when configuring the boot mode 3 program image eNVM client in Libero.
mpfsBootmodeProgrammer usage/help
13:36:43 INFO  - mpfsBootmodeProgrammer v3.6 started.
Usage: java -jar mpfsBootmodeProgrammer.jar [--workdir directory] [--die device-die] [--package device-package] [--bootmode mode] [--snvm_page page] [--usk key] [--encrypt] [--keys] [--dryrun] [--verify] [--help] [elf-file]

Note: The goal of this Java wrapper is to make fpgenprog easier to use.
Some errors produced with fpgenprog are just passed through as they are.
Users having issues with some of the errors need to contact Libero support
directly.

  --workdir directory
    Description:
      Working directory
    Default if not specified:
      Current working directory

  --die device-die
    Description:
      device-die is the target device die designator
    Allowed values:
      MPFS025T
      MPFS095T
      MPFS160T
      MPFS250T
      MPFS460T
      MPFS025T_ES
      MPFS095T_ES
      MPFS160T_ES
      MPFS250T_ES
      MPFS460T_ES
    Default if not specified:
      MPFS250T_ES

  --package device-package
    Description:
      device-package is the target device package designator
    Allowed values:
      FCG1152
      FCSG325
      FCSG536
      FCVG484
      FCVG784
    Default if not specified:
      FCVG484

  --bootmode mode
    Description:
      mode is the boot mode to be programmed
      0 = idle boot
      1 = non-secure boot from eNVM
      2 = user secure boot from sNVM
      3 = factory secure boot from eNVM
    Allowed values:
      0 to 3
    Default if not specified:
      0 = idle boot

  --snvm_page page
    Description:
      For boot mode 2 only, page is the sNVM page number starting from which the program image will be stored
    Allowed values:
      0 to 211
    Default if not specified:
      0

  --usk key
    Description:
      For boot mode 2 only, key is the User sNVM Key specified as a 12 byte hex string; if 0 then a random USK is generated and used
    Allowed values:
      any 12 byte hex string or 0, for example: 0x39ef4ad4d7d5f178f64e49d0 or 39ef4ad4d7d5f178f64e49d0 or 0
    Default if not specified:
      0

  --encrypt
    Description:
      For boot mode 2 only, use sNVM encryption to store the image as authenticated ciphertext rather than as authenticated plaintext

  --dryrun
    Description:
      Perform all tasks except target programming/verification

  --verify
    Description:
      Verify the target after programming

  --help
    Description:
      Print this help

  --keys key_mode
    Description:
      When bootmode 3 is selected, then private and public keys are required. following options are possible:
      GENERATE  - No key files are needed, both private and public keys will be generated (default mode if none is selected).
      SEPARATED - 1st argument is private key file and 2nd argument is the public key file.

      Keys have to use elliptical curve NIST P-384 algorithm (secp384r1 in Java/OpenSSL).
      The private key needs to be in PKCS#8 format with '-----BEGIN PRIVATE KEY-----' identifier.
      Currently, encrypted private keys with passwords are not supported.
      The public key needs to be X.509 format with '----BEGIN PUBLIC KEY-----' identifier.
      Using OpenSSL, the keys can be generated with the following commands:
        openssl ecparam -name secp384r1 -genkey -noout -out combined.ec.key
        openssl pkcs8 -topk8 -nocrypt -in combined.ec.key -out private.pem
        openssl ec -in private.pem -pubout -out public.pem

  elf-file
    Description:
      Boot program ELF file
    Allowed values:
      Any valid ELF filename matching the selected boot mode linkage requirements. The filename must be relative
      to the 'workdir', absolute paths are not supported.
    Default if not specified:
      If not specified then the working directory is searched for an ELF file
Security
The mpfsBootmodeProgrammer doesn’t use the log4j package because the logging capabilities are implemented from scratch. Therefore mpfsBootmodeProgrammer is not affected by the CVE-2021-44228 vulnerability.
Boot mode programmer troubleshooting
If boot mode programming fails then the Console log should indicate the nature of the problem. If necessary also check the debugLog.txt log file that mpfsBootmodeProgrammer generates for more details.
If mpfsBootmodeProgrammer cannot find fpgenprog or the required
RISC-V GCC/binutils tools then check that the FPGENPROG and SC_INSTALL_DIR
environment variables are configured correctly. Both environment variables are
set from the softconsole.{cmd|sh} start script but the FPGENPROG variable may
require adjustment depending on where Libero SoC or Programming and Debug Tools
are installed. This can be set by configuring the variable in the OS
environment, by editing the softconsole.{cmd|sh} script itself or in the
Environment tab of the boot mode programming external tool launch
configurations.
If boot mode programming succeeds but the program does not execute as expected from reset then check that the program itself executes correctly under debug from RAM (LIM) with the same optimization and debug options.
If boot mode 2 is programmed from Libero, necessitating the enabling of security options including debug locking, then debugging and boot mode programming from SoftConsole will not be possible. Boot mode programming will fail with messages similar to those below. Debugging and boot mode programming will only be possible by erasing the device and reprogramming it with security disabled.
Note
The boot mode 2 can be programmed from SoftConsole only with security disabled and only from Libero with security enabled.
Programmer '1C21ED74' : JTAG TCK frequency = 4 MHz
Error: Failed to read data from eFP6 USB buffer. Err = -1
Error: Failed to send data to eFP6. Err = -1
Error: eFP6 connection failed.
Error: programmer '1C21ED74' : device 'MPFS250T_ES' : Executing action PROGRAM FAILED.
Error: Failed to send data to eFP6. Err = -1
Error: programmer '1C21ED74' : Error: eFP6 connection failed.
Error: Failed to send data to eFP6. Err = -1
Error: programmer '1C21ED74' : Error: Failed to disable eFP6 programmer
Error: programmer '1C21ED74' : Chain programming FAILED.
Chain Programming Finished: Mon Mar 1 10:49:54 2021 (Elapsed time 00:00:06)
Error: Failed to run Action.
Exported log file D:\sandbox\icicle-kit\MPFS_ICICLE_eMMC\designer\MPFS_ICICLE_eMMC\MPFS_ICICLE_eMMC_fp\MPFS_ICICLE_eMMC.log.
Error: The command 'run_selected_actions' failed.
Error: Failure when executing Tcl script. [ Line 5 ]
Error: The Execute Script command failed.
Known issues/limitations
The following known issues and limitations will be addressed in a future release.
There is no facility to select a specific FlashPro programmer when there is more than one connected. For best results ensure that only one FlashPro programmer is connected.
Boot mode 0 overwrites page 0 of eNVM because the boot mode cannot be changed without at least one NVM (eNVM or sNVM) client being specified at the moment.
mpfsBootmodeProgrammer does not initialize or reset the SMK (sNVM Master Key) and assumes that this has been previously configured appropriately. If this is not the case (for example, for a new device) then an attempt to program boot mode 2 from SoftConsole will result in messages similar to the following and the SMK will need to be configured/initialized from Libero by programming an appropriate design that causes the SMK to be (re)generated:
programmer 'S201QVSUE' : device 'target' : EXPORT BITS component bitstream digest[256] = 25295f0d1d592a90b333e26e85149708208e9f8e8bc18f6c77bd62f8ad7a6866
programmer 'S201QVSUE' : device 'target' : Programming Error.
programmer 'S201QVSUE' : device 'target' : Bitstream or data is corrupted or noisy.
programmer 'S201QVSUE' : device 'target' : componentNo: 3
programmer 'S201QVSUE' : device 'target' : blockNo: 155
programmer 'S201QVSUE' : device 'target' : EXPORT DATA_STATUS_RESULT: [64] = 0002000900008407
programmer 'S201QVSUE' : device 'target' : EXPORT READ_DEBUG_INFO[752] = >  0000000000030003017f00000080040001000000000000000000000000000000001a0000001e000000db000003000002000900008400fc5e52012dd402010000000000000000000000000084071309c709c709c700280028002824000000
programmer 'S201QVSUE' : device 'target' : EXPORT ERROR_CODE[16] = 801f
programmer 'S201QVSUE' : device 'target' : ===================================================================================
programmer 'S201QVSUE' : device 'target' : EXPORT DSN[128] = 4883b6958cf34738ba77807d1bb91b7f
programmer 'S201QVSUE' : device 'target' : ===================================================================================
programmer 'S201QVSUE' : device 'target' : Finished: Sat Mar 20 01:45:56 2021 (Elapsed time 00:00:01)
Error: [80609294]:  programmer 'S201QVSUE' : device 'target' : Executing action PROGRAM FAILED, EXIT -22, refer to FlashPro online help for details.
@@ACTIVITY 101
Error:  programmer 'S201QVSUE' : Chain programming FAILED.
Elliptic Curve Cryptography private and public keys for boot mode 3 are automatically generated and there is no facility to pass an external key file yet.
Note
Support for “advanced” options such as U_MSS_BOOTCFG:U_MSS_REVOCATION_ENABLE, SBIC:OPTIONS[7:0], SBIC:VERSION and SBIC:DSN is not yet available.
Warning
Boot mode programming assumes that the full capacity of eNVM and sNVM is available for storing the boot loader program and does not have any knowledge of any eNVM/sNVM clients configured via other tools (e.g. PolarFire SoC MSS Configurator, Libero SoC etc.). It is important, especially for boot mode 2, to check that only unused/available NVM is used from SoftConsole when programming boot modes.
mpfsBootmodeProgrammer assumes that the base address of the program image is
identical to the program start address (_start) which is true when using the
PolarFire SoC HAL example linker scripts but may not be so in the general case.
fpgenprog fails to program the board
Sometimes user can experience program failures even when running PolarFire SoC program idle boot mode 0 external launcher:
Warning:  Unable to find file: 'C:\Microchip\SoftConsole-v2022.2-RISC-V\extras\mpfs\bootmode0\fpgenprogProject\target.pdb'.
Warning: [80609481]:  Using local backup copy: 'C:\Microchip\SoftConsole-v2022.2-RISC-V.1\extras\mpfs\bootmode0\fpgenprogProject\proj_fp\projectData\target.pdb'.
PDB file 'C:\Microchip\SoftConsole-v2022.2-RISC-V\extras\mpfs\bootmode0\fpgenprogProject\proj_fp\projectData\target.pdb' has been loaded successfully.
DESIGN : TOP;  CHECKSUM : 0000;  PDB_VERSION : 1.9
===============================================================
Programmer: Embedded FP6 '082D3559' : Version = EF9B
===============================================================
programmer '082D3559' : Embedded FlashPro6
Opened 'C:\Microchip\SoftConsole-v2022.2-RISC-V\extras\mpfs\bootmode0\fpgenprogProject\proj_fp\proj_fp.pro'
The 'open_project' command succeeded.
Info:  Programming is already enabled for device 'target'.
The 'enable_device' command succeeded.
PPD file 'C:/Microchip/SoftConsole-v2022.2-RISC-V/extras/mpfs/bootmode0/fpgenprogProject/proj_fp/target.ppd' has been loaded successfully.
DESIGN : TOP;  CHECKSUM : 0000;  PDB_VERSION : 1.0
The 'set_programming_file' command succeeded.
The 'set_programming_action' command succeeded.
programmer '082D3559' : Scan Chain...
programmer '082D3559' : Check Chain...
programmer '082D3559' : Scan and Check Chain PASSED.
@@ACTIVITY 1
programmer '082D3559' : device 'target' : Executing action PROGRAM
Performing FPGA action. Please wait...
eFP6 acceleration mode enabled with PPD file. Please wait...
@@ACTIVITY 2

16:45:46 ERROR - Running the fpgenprog.exe PROGRAM action failed.
To see more verbose errors it’s good to run the last fpgenprog invocation again from the command line. To see the log file, for example for boot mode 0 it’s in the <SC_INSTALL_DIR>/extras/mpfs/bootmode0/debugLog.txt. The last fpgenprog invocation should look similar like to:
c:\microchip\libero\Program_Debug_v2022.2\Program_Debug_Tool\bin64\fpgenprog.exe run_action --location c:/microchip/SoftConsole-v2022.2-RISC-V/extras\mpfs/bootmode0/fpgenprogProject --action PROGRAM
17:03:29 INFO  - Selected boot mode "0 - idle boot" and working in directory "D:\work\microchip\SoftConsole-v2022.2-RISC-V\extras\mpfs".
17:03:29 DEBUG - Workdir=D:\work\microchip\SoftConsole-v2022.2-RISC-V\extras\mpfs die=MPFS250T_ES diePackage=FCVG484 bm=0 - idle boot verify=false elf=null
17:03:29 DEBUG - Invoking command: "D:\work\microchip\libero\Program_Debug_v2022.2\Program_Debug_Tool\bin64\fpgenprog.exe new_project --location D:\work\microchip\SoftConsole-v2022.2-RISC-V\extras\mpfs/bootmode0/fpgenprogProject --target_die MPFS250T_ES --target_package FCVG484".
17:03:30 DEBUG - Finished with exit code: "0".
17:03:30 INFO  - Preparing for bitstream generation...
17:03:30 DEBUG - Invoking command: "D:\work\microchip\libero\Program_Debug_v2022.2\Program_Debug_Tool\bin64\fpgenprog.exe mss_boot_info --location D:\work\microchip\SoftConsole-v2022.2-RISC-V\extras\mpfs/bootmode0/fpgenprogProject --u_mss_bootmode 0".
17:03:30 DEBUG - Finished with exit code: "0".
17:03:30 DEBUG - Invoking command: "D:\work\microchip\libero\Program_Debug_v2022.2\Program_Debug_Tool\bin64\fpgenprog.exe envm_client --location D:\work\microchip\SoftConsole-v2022.2-RISC-V\extras\mpfs/bootmode0/fpgenprogProject --number_of_bytes 1 --content_file_format intel-hex --content_file D:\work\microchip\SoftConsole-v2022.2-RISC-V\extras\mpfs/bootmode0/bootmode0.hex --start_page 0 --client_name bootmode0_0".
17:03:30 DEBUG - Finished with exit code: "0".
17:03:30 INFO  - Generating bitstream...
17:03:30 DEBUG - Invoking command: "D:\work\microchip\libero\Program_Debug_v2022.2\Program_Debug_Tool\bin64\fpgenprog.exe generate_bitstream --location D:\work\microchipSoftConsole-v2022.2-RISC-V\extras\mpfs/bootmode0/fpgenprogProject".
17:03:43 DEBUG - Finished with exit code: "0".
17:03:43 INFO  - Programming the target...
17:03:43 DEBUG - Invoking command: "D:\work\microchip\libero\Program_Debug_v2022.2\Program_Debug_Tool\bin64\fpgenprog.exe run_action --location D:\work\microchip\SoftConsole-v2022.2-RISC-V\extras\mpfs/bootmode0/fpgenprogProject --action PROGRAM".
17:03:46 DEBUG - Finished with exit code: "1".
17:03:46 INFO  - Console Mode = Software Version: v2022.2
Warning:  Unable to find file: 'D:\work\microchip\SoftConsole-v2022.2-RISC-V\extras\mpfs\bootmode0\fpgenprogProject\target.pdb'.
Warning: [80609481]:  Using local backup copy: 'D:\work\microchip\SoftConsole-v2022.2-RISC-V.1\extras\mpfs\bootmode0\fpgenprogProject\proj_fp\projectData\target.pdb'.
PDB file 'D:\work\microchip\SoftConsole-v2022.2-RISC-V\extras\mpfs\bootmode0\fpgenprogProject\proj_fp\projectData\target.pdb' has been loaded successfully.
DESIGN : TOP;  CHECKSUM : 0000;  PDB_VERSION : 1.9
Opened 'D:\work\microchip\SoftConsole-v2022.2-RISC-V\extras\mpfs\bootmode0\fpgenprogProject\proj_fp\proj_fp.pro'
The 'open_project' command succeeded.
Info:  Programming is already enabled for device 'target'.
The 'enable_device' command succeeded.
PPD file 'D:/work/microchip/SoftConsole-v2022.2-RISC-V/extras/mpfs/bootmode0/fpgenprogProject/proj_fp/target.ppd' has been loaded successfully.
DESIGN : TOP;  CHECKSUM : 0000;  PDB_VERSION : 1.0
The 'set_programming_file' command succeeded.
The 'set_programming_action' command succeeded.
Error:  No programmers found. Please check the programmer connection to the computer and ensure the drivers are properly installed.
Error:  Failed to run Action.
Exported log file D:\work\microchip\SoftConsole-v2022.2-RISC-V\extras\mpfs\bootmode0\fpgenprogProject\proj_fp\proj_fp.log.
Error:  The command 'run_selected_actions' failed.
Error:  Failure when executing Tcl script. [ Line 5 ]
Error:  The Execute Script command failed.
Exported log file D:\work\microchip\SoftConsole-v2022.2-RISC-V\extras\mpfs/bootmode0/fpgenprogProject\proj_fp\proj_fp.log.
Software Version: v2022.2
Warning: Unable to find file: 'D:\work\microchip\SoftConsole-v2022.2-RISC-V\extras\mpfs\bootmode0\fpgenprogProject\target.pdb'.
Warning: Using local backup copy: 'D:\work\microchip\SoftConsole-v2022.2-RISC-V\extras\mpfs\bootmode0\fpgenprogProject\proj_fp\projectData\target.pdb'.
PDB file 'D:\work\microchip\SoftConsole-v2022.2-RISC-V\extras\mpfs\bootmode0\fpgenprogProject\proj_fp\projectData\target.pdb' has been loaded successfully.
DESIGN : TOP;  CHECKSUM : 0000;  PDB_VERSION : 1.9
Opened 'D:\work\microchip\SoftConsole-v2022.2-RISC-V\extras\mpfs\bootmode0\fpgenprogProject\proj_fp\proj_fp.pro'
The 'open_project' command succeeded.
Info: Programming is already enabled for device 'target'.
The 'enable_device' command succeeded.
PPD file 'D:/work/microchip/SoftConsole-v2022.2-RISC-V/extras/mpfs/bootmode0/fpgenprogProject/proj_fp/target.ppd' has been loaded successfully.
DESIGN : TOP;  CHECKSUM : 0000;  PDB_VERSION : 1.0
The 'set_programming_file' command succeeded.
The 'set_programming_action' command succeeded.
Error: No programmers found. Please check the programmer connection to the computer and ensure the drivers are properly installed.
Error: Failed to run Action.
Exported log file D:\work\microchip\SoftConsole-v2022.2-RISC-V\extras\mpfs\bootmode0\fpgenprogProject\proj_fp\proj_fp.log.
Error: The command 'run_selected_actions' failed.
Error: Failure when executing Tcl script. [ Line 5 ]
Error: The Execute Script command failed.

17:03:46 ERROR - Running the fpgenprog.exe PROGRAM action failed.
If invoking the fpgenprog from command line shows the following error: Error: Failed to run action. Return code = -1073741819. Then contact support for Libero or Program and Debug as this issue is outside SoftConsole’s scope.
Linux fpgenprog invokes 32-bit binaries
Linux fpgenprog run from the Libero or from Program and Debug will invoke 32-bit binaries, which means the 64-bit Linux will have to have extra 32-bit libraries installed. If they are not, then the following error might be observed:
INFO  - Generating bitstream...
ERROR - /usr/local/microchip/Program_Debug_v2022.2/Program_Debug_Tool/binfp/fpbitgen_bin: not found
ERROR - Error: Failed to generate fp.pro. Return code = 32512
To solve this issue read the ‘Libero’ or ‘Program and Debug’ documentation, or contact the support team for ‘Libero’ or ‘Program and Debug’ as this issue is outside SoftConsole’s scope. However, Ubuntu and Debian users might solve it just by running the following commands:
sudo dpkg --add-architecture i386
sudo apt-get update
sudo apt-get install libstdc++6:i386 libz-dev:i386